Exercise 2 - Setting up the backlog with Copilot agent mode and GitHub’s MCP Server
There’s more to writing code than just writing code. Issues need to be filed, external services need to be called, and information needs to be gathered. Typically this involves interacting with external tools, which can break a developer’s flow. Through the power of Model Context Protocol (MCP), you can access all of this functionality right from Copilot!
Scenario
You are a part-time developer for Tailspin Toys - a crowdfunding platform for board games with a developer theme. You’ve been assigned various tasks to introduce new functionality to the website. Being a good team member, you want to file issues to track your work. To help future you, you’ve decided to enlist the help of Copilot. You will set up your backlog of work for the rest of the lab, using GitHub Copilot Chat agent mode and the GitHub Model Context Protocol (MCP) server to create the issues for you.
To achieve this, you will:
- use Model Context Protocol (MCP), which provides access to external tools and capabilities.
- set up the GitHub MCP server in your repository.
- use GitHub Copilot Chat agent mode to create issues in your repository.
By the end of this exercise, you will have created a backlog of GitHub issues for use throughout the remainder of the lab.
What is agent mode and Model Context Protocol (MCP)?
Agent mode in GitHub Copilot Chat transforms Copilot into an AI agent that can perform actions on your behalf. This mode allows you to interact with Copilot in a more dynamic way, enabling it to use tools and execute tasks, like running tests or terminal commands, reading problems from the editor, and using those insights to update your code. This allows for a more interactive and collaborative workflow, enabling you to leverage the capabilities of AI in your development process.
Model Context Protocol (MCP) provides AI agents with a way to communicate with external tools and services. By using MCP, AI agents can communicate with external tools and services in real-time. This allows them to access up-to-date information (using resources) and perform actions on your behalf (using tools).
These tools and resources are accessed through an MCP server, which acts as a bridge between the AI agent and the external tools and services. The MCP server is responsible for managing the communication between the AI agent and the external tools (such as existing APIs or local tools like NPM packages). Each MCP server represents a different set of tools and resources that the AI agent can access.
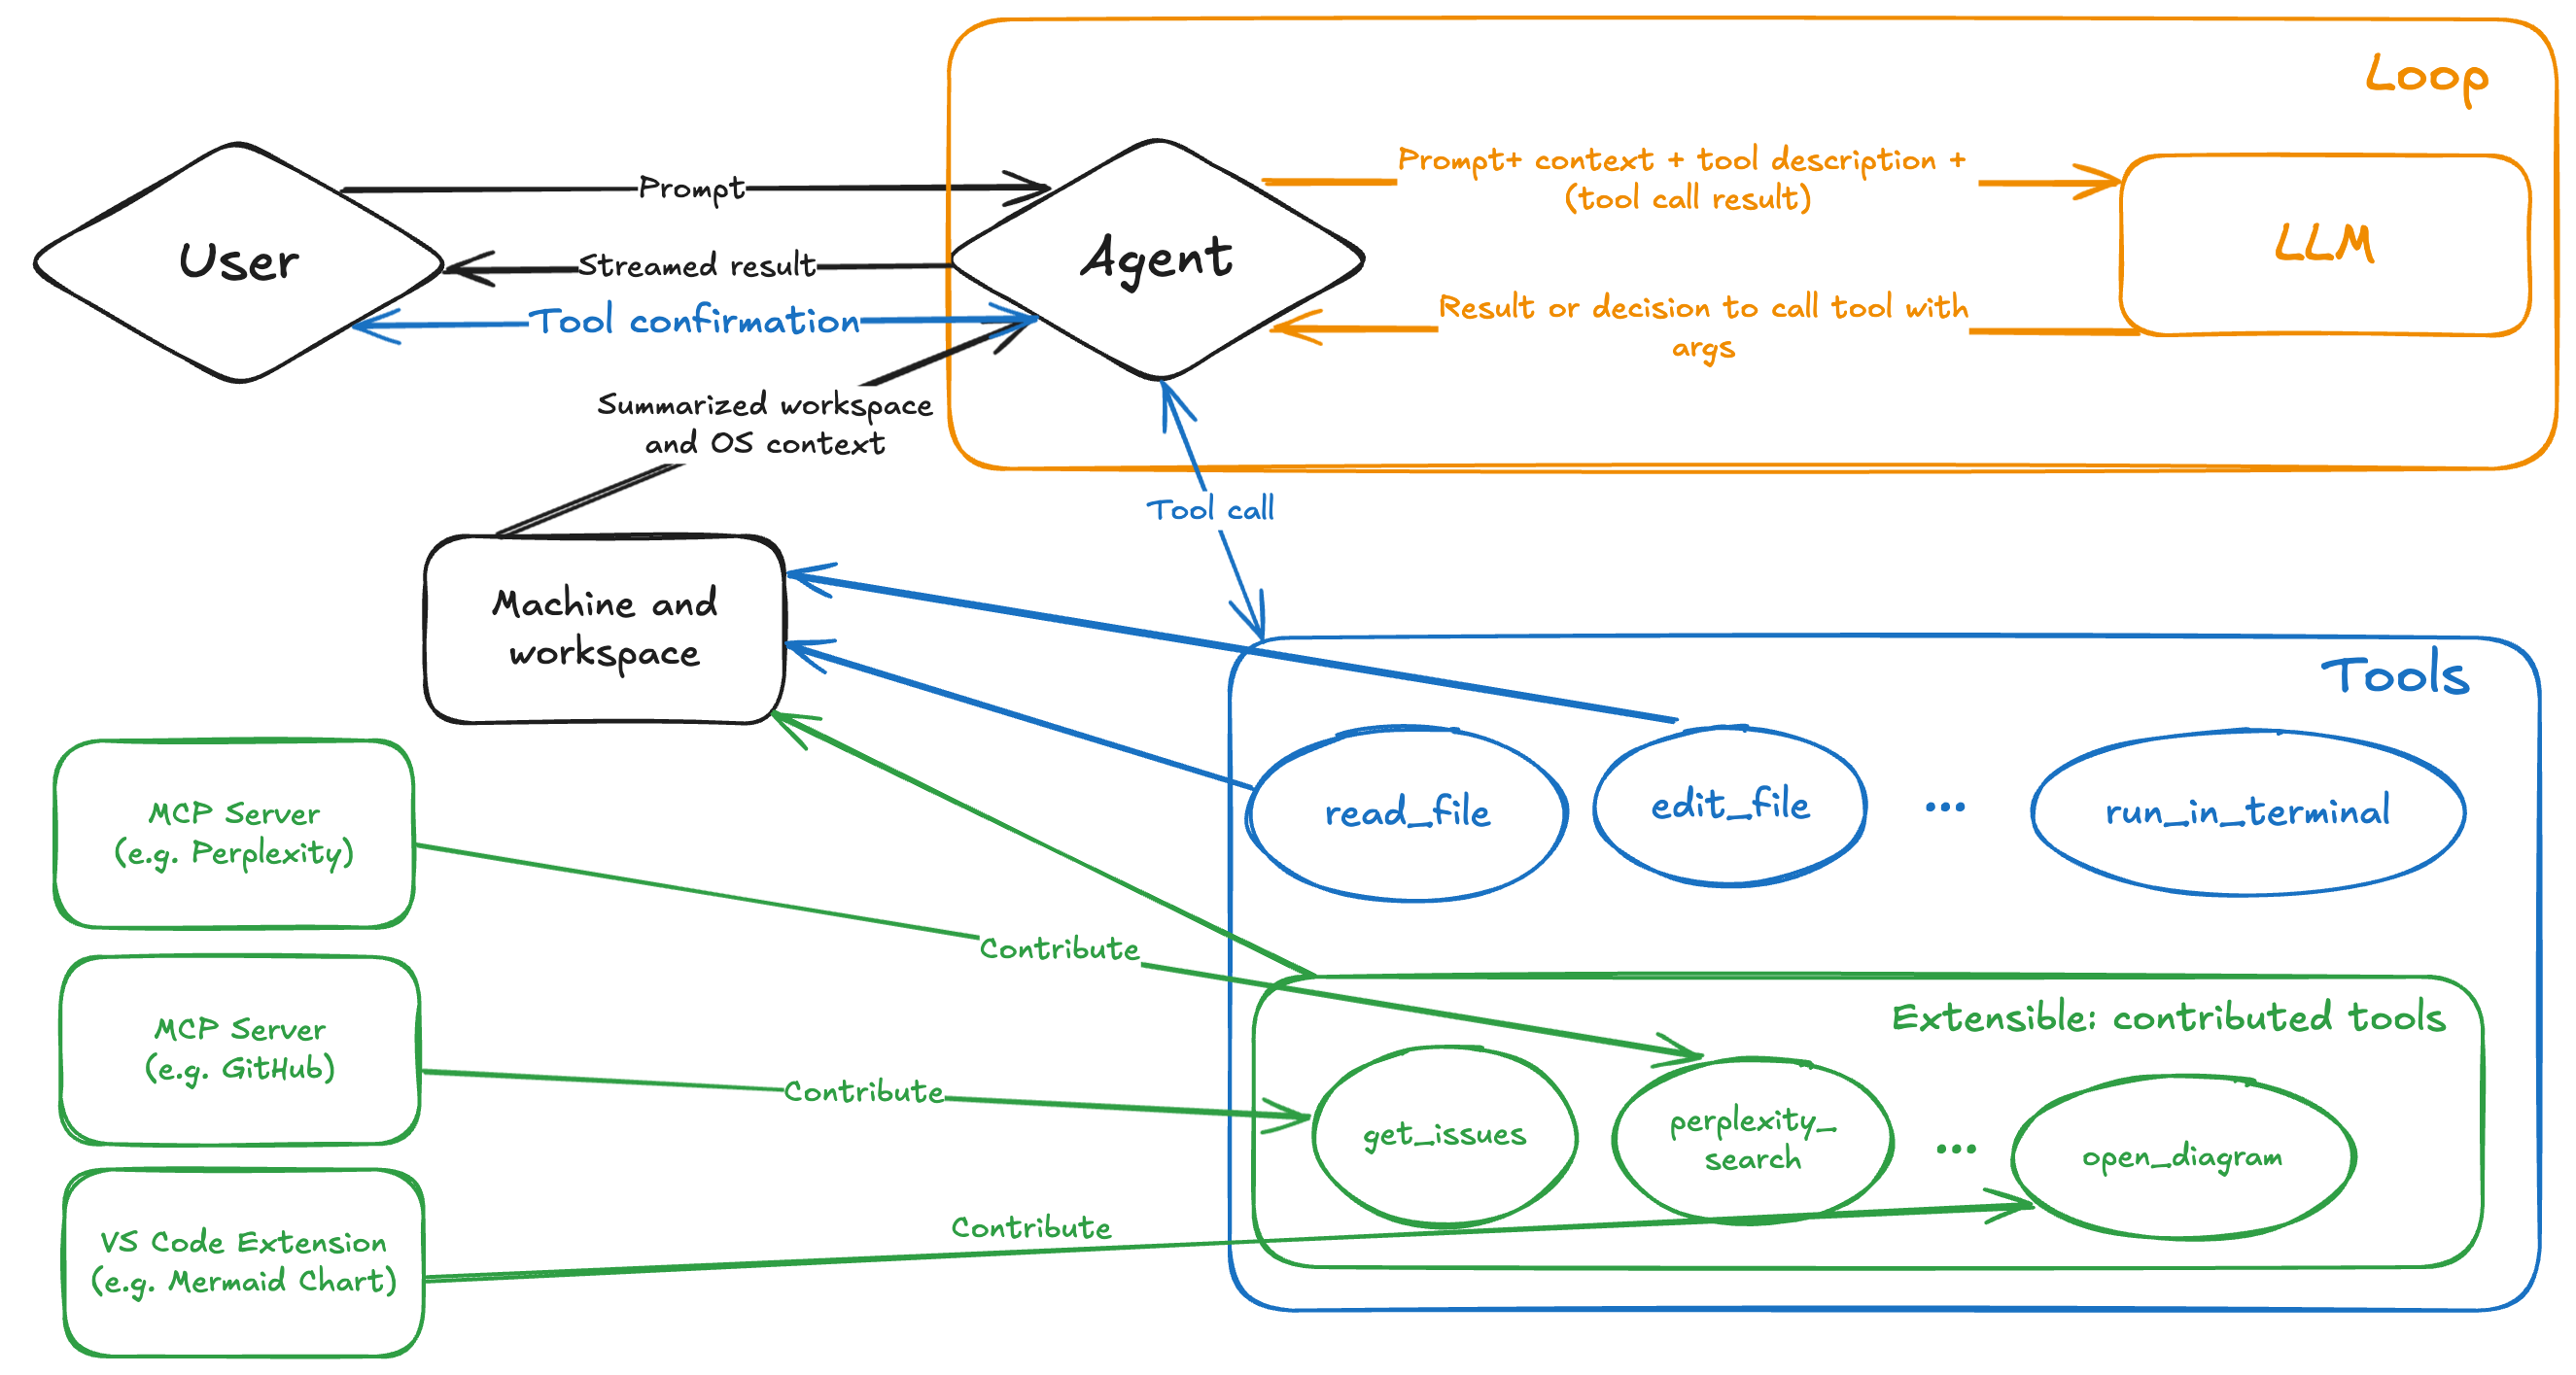
Popular existing MCP servers include:
- GitHub MCP Server: This server provides access to a set of APIs for managing your GitHub repositories. It allows the AI agent to perform actions such as creating new repositories, updating existing ones, and managing issues and pull requests.
- Playwright MCP Server: This server provides browser automation capabilities using Playwright. It allows the AI agent to perform actions such as navigating to web pages, filling out forms, and clicking buttons.
- Additional reference servers: There are many other MCP servers available that provide access to different tools and resources. Anthropic has a list of MCP servers, including reference, third-party, and community implementations.
[!IMPORTANT] With regard to security, treat MCP servers as you would any other dependency in your project. Before using an MCP server, carefully review its source code, verify the publisher, and consider the security implications. Only use MCP servers that you trust and be cautious about granting access to sensitive resources or operations.
Ensure your codespace is ready
In a prior exercise you launched the codespace you’ll use for the remainder of the coding exercises in this lab. Let’s put the final touches on it before we begin using it.
The setup process for the codespace installed and setup many VS Code extensions. As with any software, updates may be needed. When your codespace is created we’ll need to ensure everything is up-to-date.
- Return to the tab where you started your codespace. If you closed the tab, return to your repository, select Code > Codespaces and then the name of the codespace.
-
Select Extensions on the workbench on the left side of your codespace.
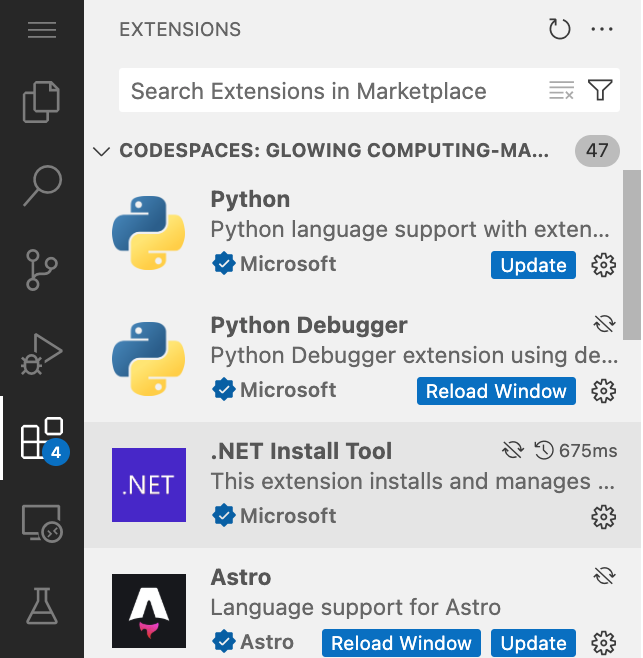
- Select Update on any extensions with an Update button. Repeat as necessary.
- Select Reload Window on any extensions with a Reload Window button to reload the codespace.
- When prompted by a dialog, select Reload to reload the window. This will ensure the latest version is being used.
Using GitHub Copilot Chat and agent mode
To access GitHub Copilot Chat agent mode, you need to have the GitHub Copilot Chat extension installed in your IDE, which should already be the case if you are using a GitHub Codespace.
[!TIP] If you do not have the GitHub Copilot Chat extension installed, you can install it from the Visual Studio Code Marketplace. Or open the Extensions view in Visual Studio Code, search for GitHub Copilot Chat, and select Install.
Once you have the extension installed, you may need to authenticate with your GitHub account to enable it.
- Return to your codespace.
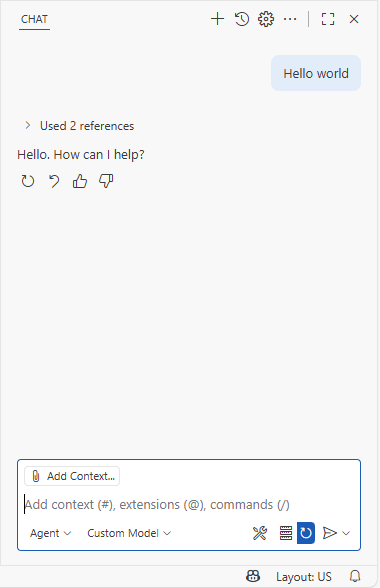
- Select the Copilot Chat icon at the top of your codespace.
-
Type a message like “Hello world” in the Copilot Chat window and press enter. This should activate Copilot Chat.
-
Alternatively, if you are not authenticated you will be prompted to sign in to your GitHub account. Follow the instructions to authenticate.

-
After authentication, you should see the Copilot Chat window appear.
-
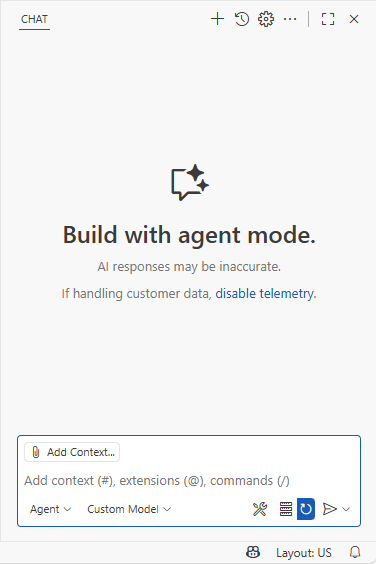
If you’re not already in Agent mode, you can switch to agent mode by selecting the dropdown in the Copilot Chat window and selecting Agent.
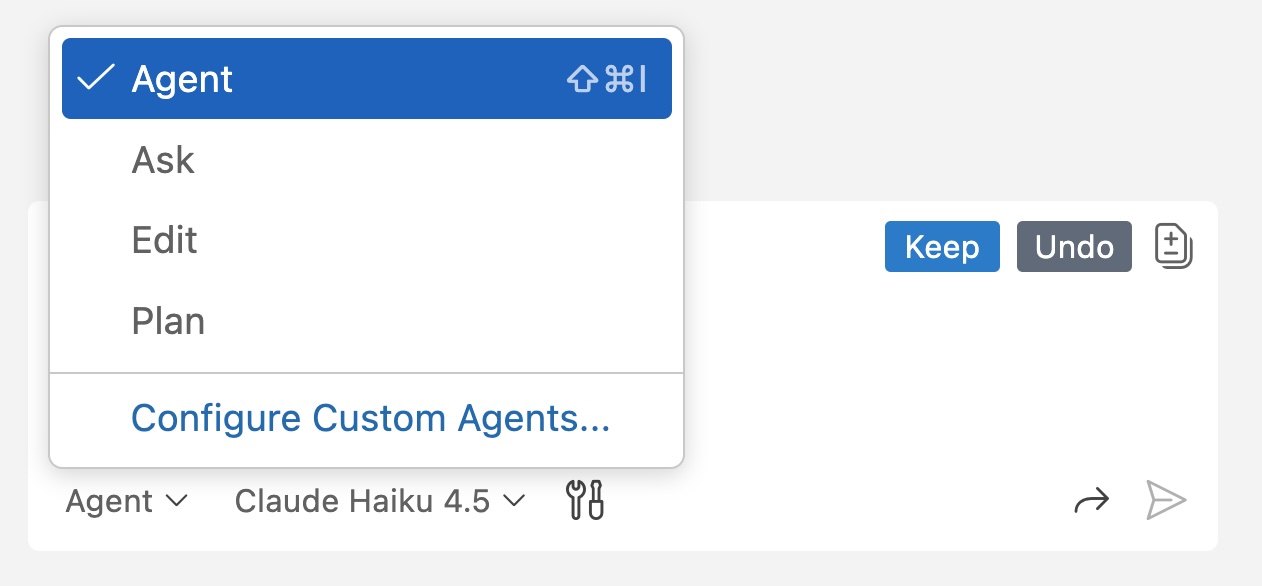
-
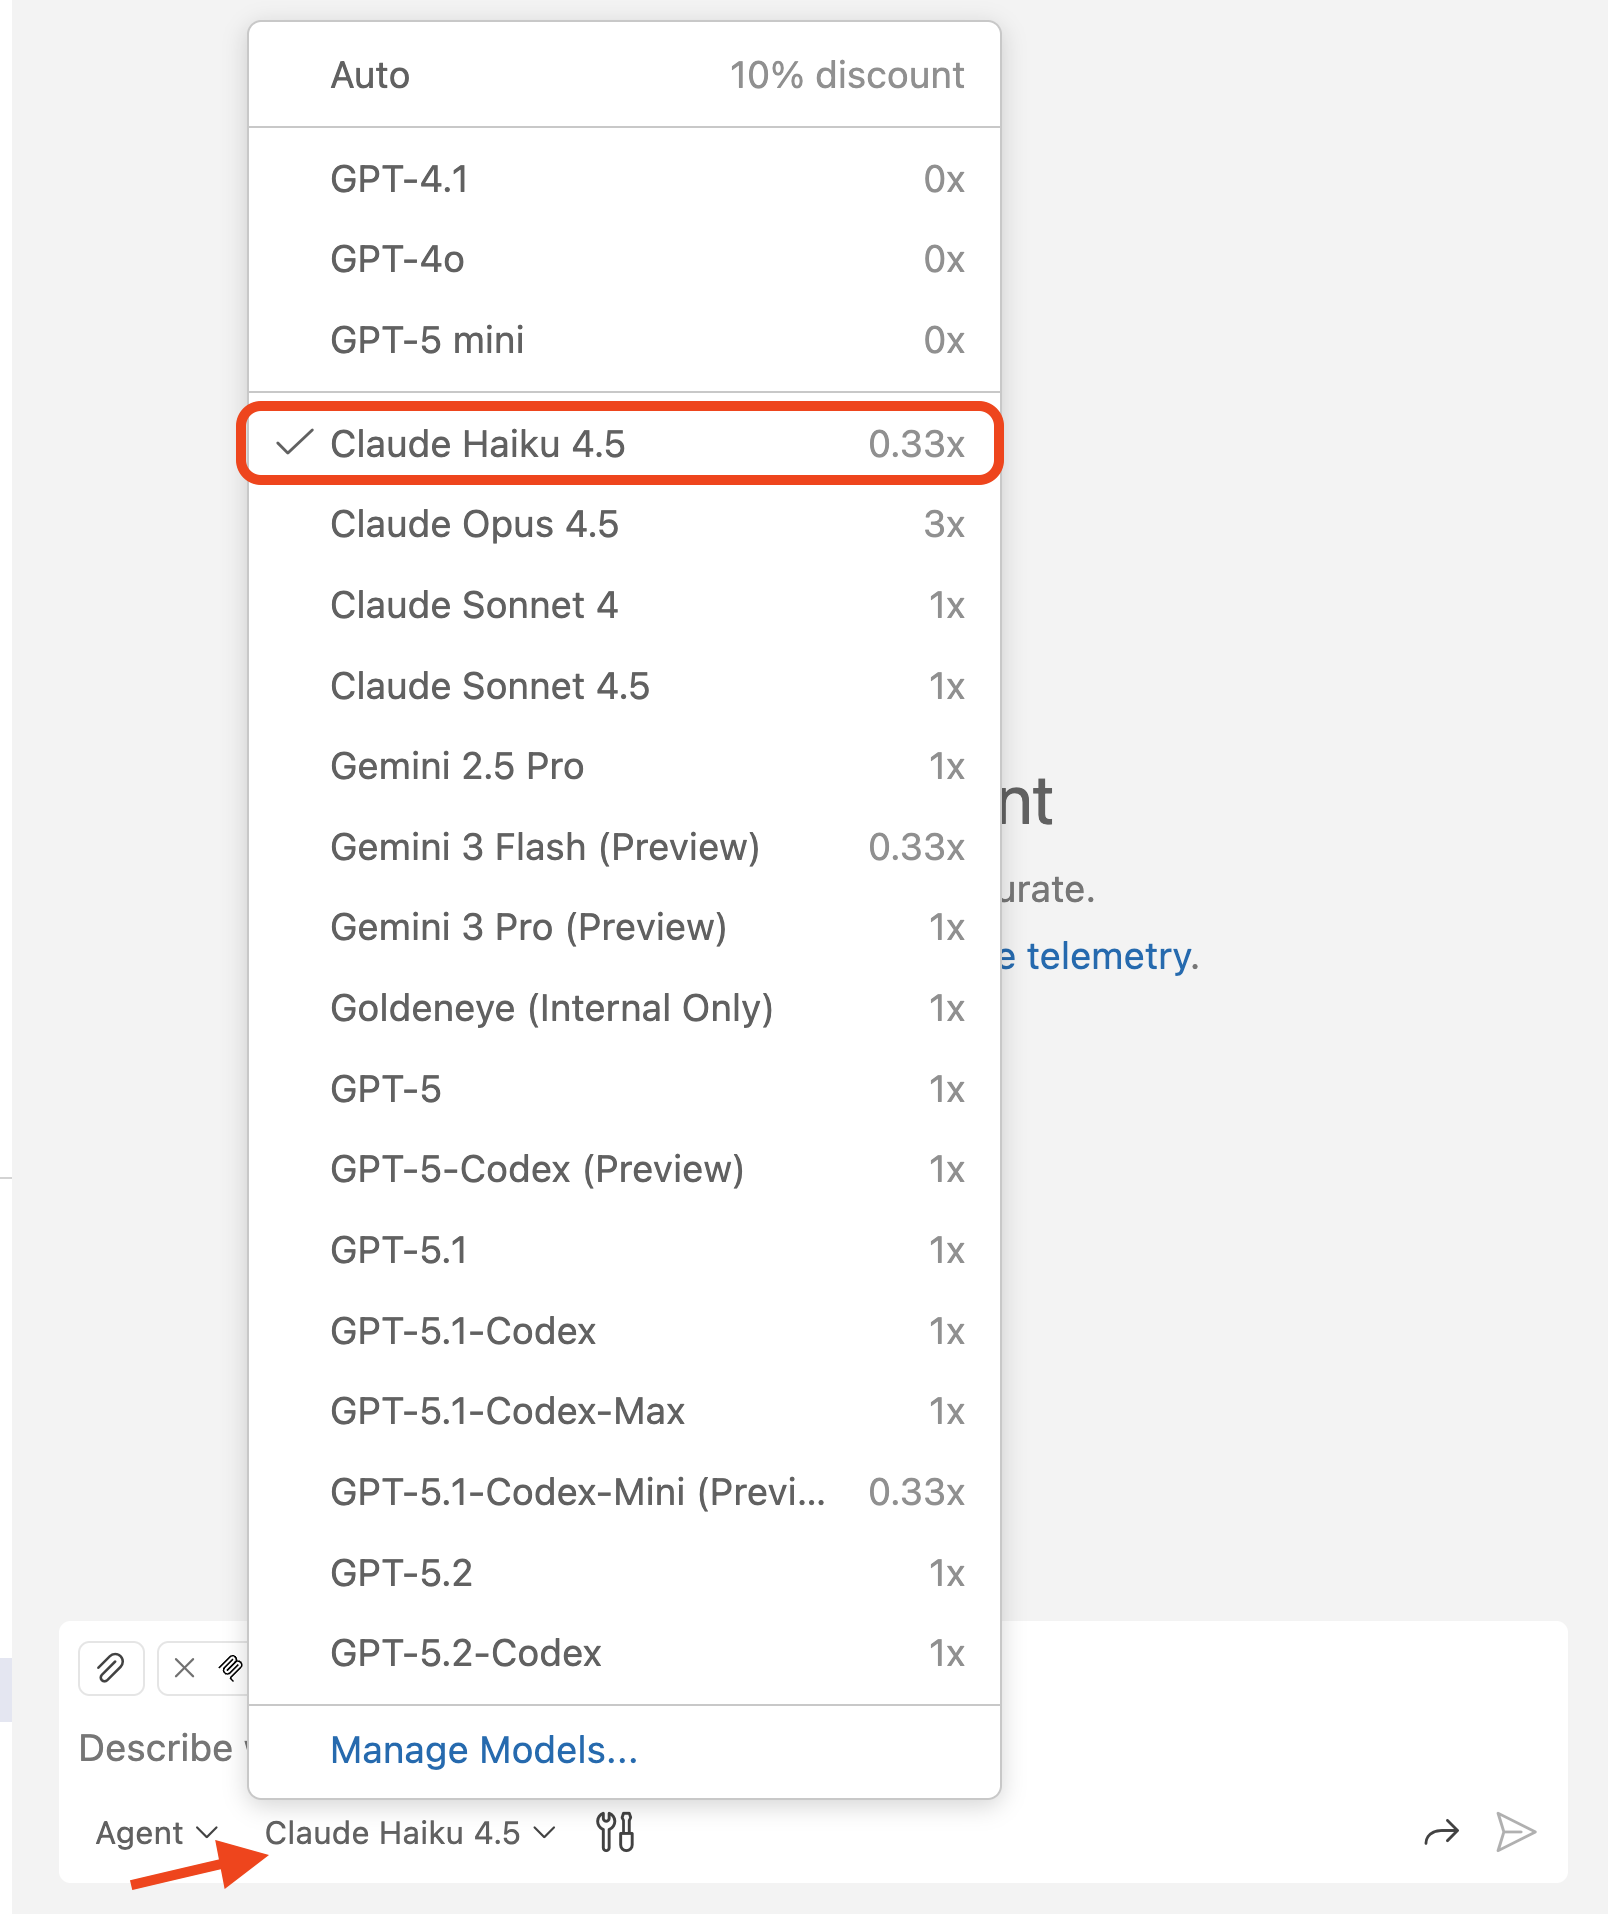
Set the model to Claude Sonnet 4.
[!IMPORTANT] The authors of this lab are not indicating a preference towards one model or another. When building this lab, we used Claude Sonnet 4, and as such are including that in the instructions. The hope is the code suggestions you receive will be relatively consistent to ensure a good experience. However, because LLMs are probabilistic, you may notice the suggestions received differ from what is indicated in the lab. This is perfectly normal and expected.
-
The chat pane should update to indicate that you are now in agent mode. You should see a tools icon, showing that we can configure tools for GitHub Copilot to use.

Typically, the number of tools available will be set to 0 when setting up a new project, as we have not configured any MCP servers yet. But to help you get started, we have created a .vscode/mcp.json file with an example configuration for the GitHub MCP server. Let’s go and explore that next.
Setting up the GitHub MCP server
The .vscode/mcp.json file is used to configure the MCP servers that are available in this Visual Studio Code workspace. The MCP servers provide access to external tools and resources that GitHub Copilot can use to perform actions on your behalf.
- Open .vscode/mcp.json file in your repository.
-
You should see a JSON structure similar to the following:
 {
     "servers": {
         "github": {
         "type": "http",
         "url": "https://api.githubcopilot.com/mcp/"
         }
     }
 }
This configuration provides GitHub Copilot access to several additional tools so that it can interact with GitHub repositories, issues, pull requests, and more. This particular configuration uses the remote GitHub MCP server. By using this approach, we don’t need to worry about running the MCP server locally (and the associated management, like keeping it up to date), and we can authenticate to the remote server using OAuth 2.0 instead of a personal access token (PAT).
The MCP server configuration is defined in the servers section of the mcp.json file. Each MCP server is defined by a unique name (in this case, github) and its type (in this case, http). When using local MCP servers, the type may be stdio and have a command and args field to specify how to start the MCP server. You can find out more about the configuration format in the VS Code documentation. In some configurations (not for the remote GitHub MCP server with OAuth), you may also see an inputs section. This defines any inputs (like sensitive tokens) that the MCP server may require. You can read more about the configuration properties in the VS Code documentation
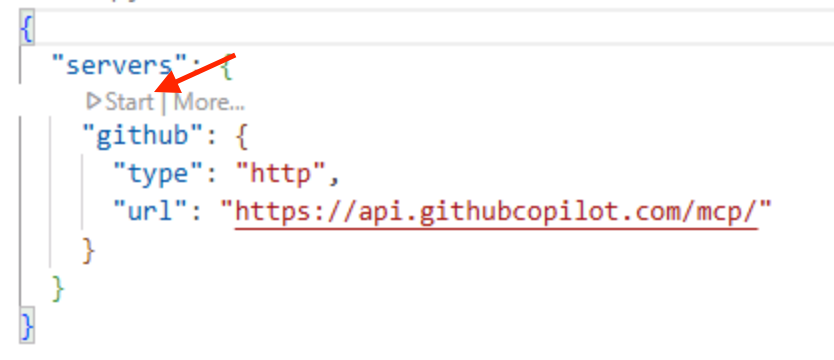
To utilize an MCP server it needs to be “started”. This will allow GitHub Copilot to communicate with the server and perform the tasks you request.
- Inside VS Code, open .vscode/mcp.json.
-
To start the GitHub MCP server, select Start above the GitHub server.
-
You should see a popup asking you to authenticate to GitHub.
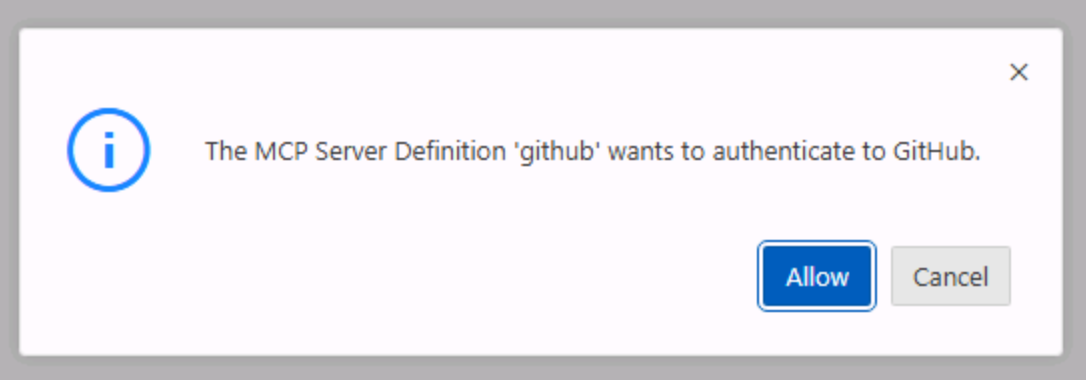
-
Select Continue on the user account that you’re using for this lab.
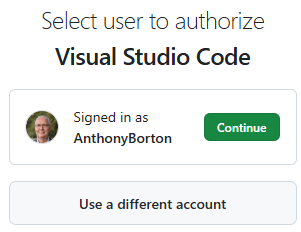
-
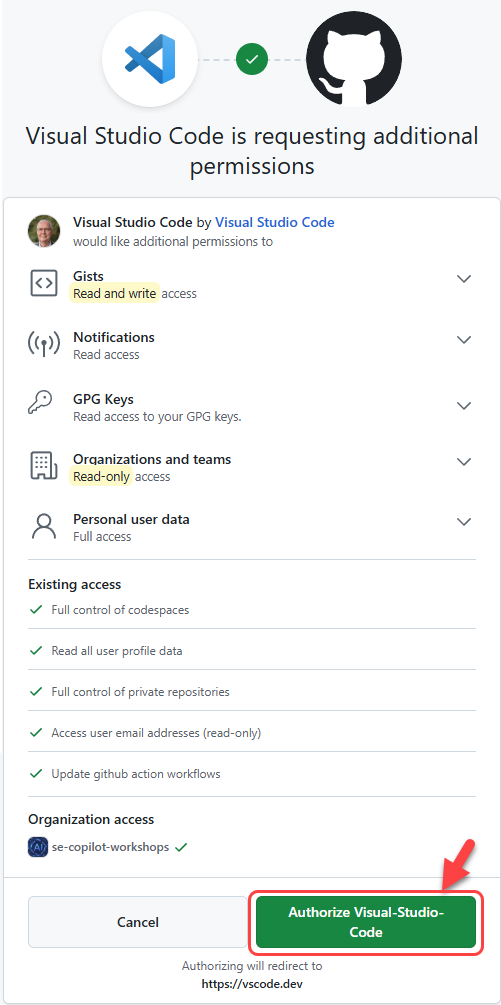
If the page appears, select Authorize visual-studio-code to allow the GitHub MCP server to login as your selected user account. Once complete, the page should say “You can now close the window.”.
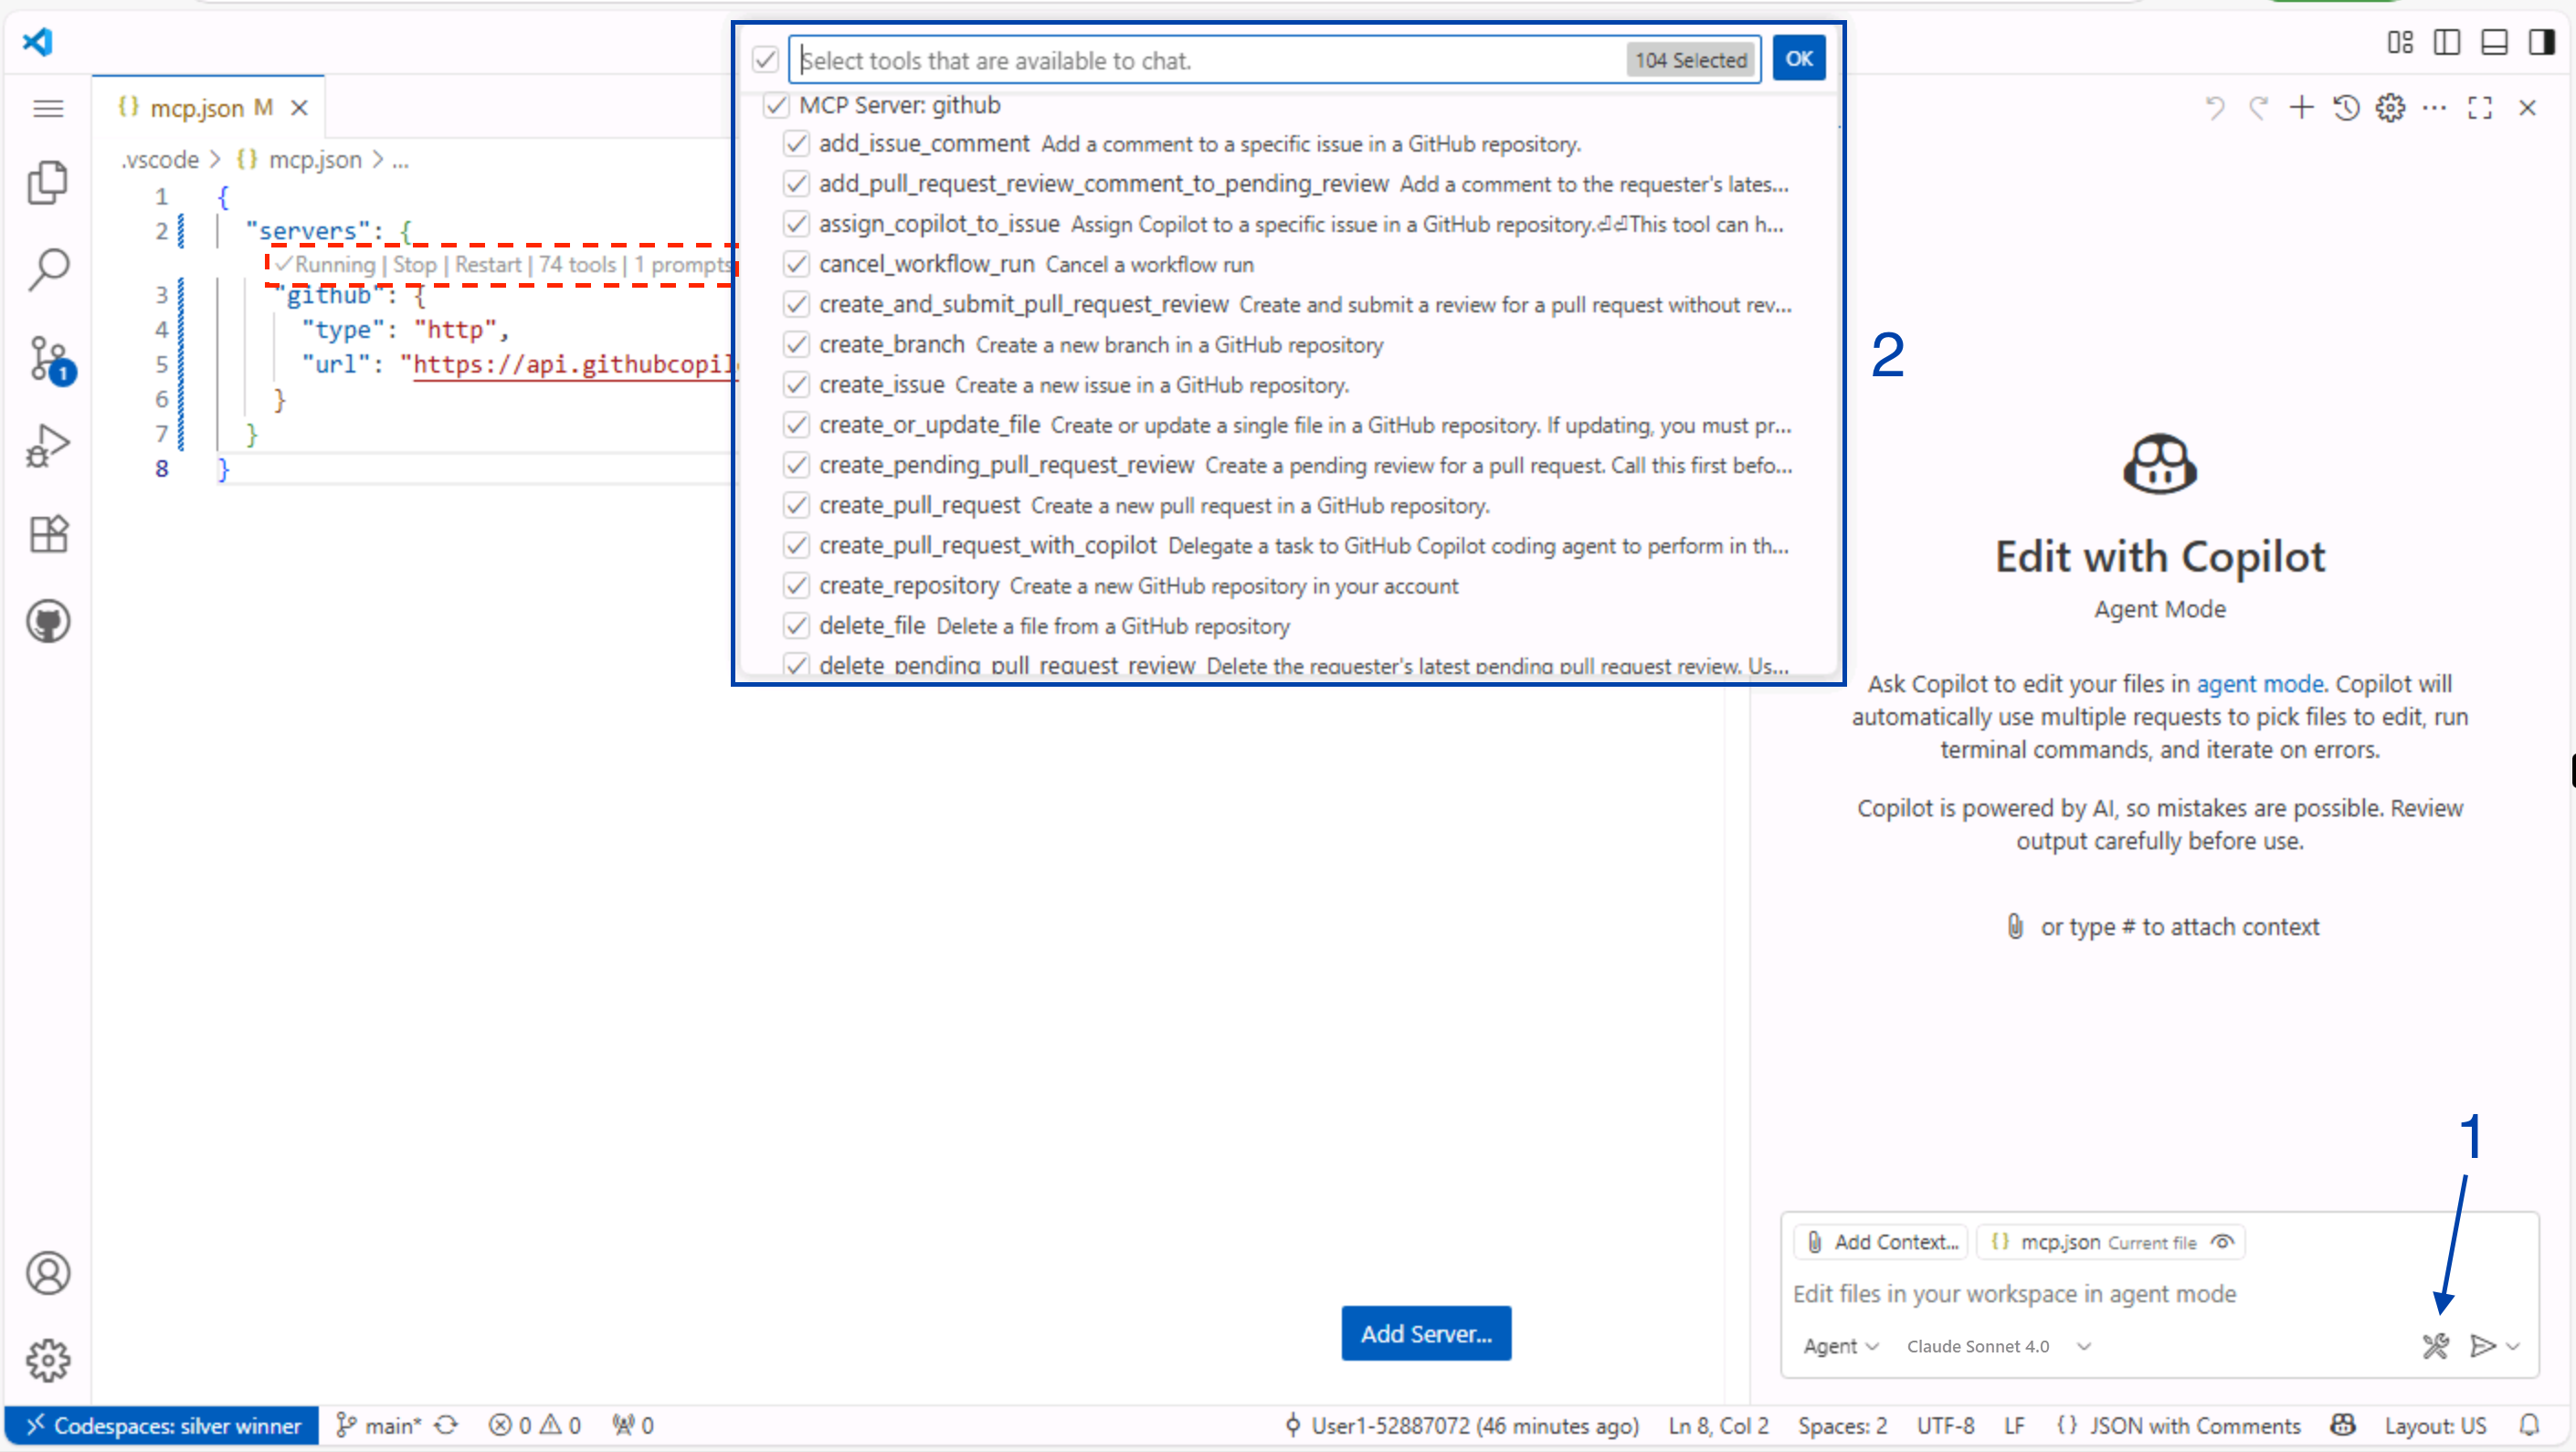
- After navigating back to the GitHub Codespace, you should see that the GitHub MCP server has started. You can check this in two places:
- The line in .vscode/mcp.json which previously said start. It should now present several options, and show a number of tools available.
- Select the tools icon in the Copilot Chat pane to see the tools available. Scroll down the list that appears at the top of the screen, and you should see a list of tools from the GitHub MCP server.
That’s it! You can now use Copilot Chat in agent mode to create issues, manage pull requests, and more.
[!IMPORTANT] If you have any issues with this MCP server configuration, there are alternate configuration options in the GitHub MCP server repository using local or remote MCP. If you opt for a configuration that requires authentication via a GitHub Personal Access Token (PAT), make sure that you do not share it with anyone. Treat it like a password and keep it secure. That means you should not check it into source control or share it with anyone else.
Because it is a sensitive password, DO NOT paste it into the mcp.json file. Instead use the inputs property to pass the token as an input variable. Published tokens is one of the leading causes of security breaches.
Creating a backlog of tasks
Now that you have set up the GitHub MCP server, you can use Copilot Agent mode to create a backlog of tasks for use in the rest of the lab.
-
Return to the Copilot Chat pane. Select Agent from the dropdown list. Set the model to Claude Sonnet 4.
-
Type or paste the following prompt to create the issues we’ll be working on in the lab, replacing **
** with the organization/name of your repository: In <YOUR_REPOSITORY_PATH>, create GitHub issues for our Tailspin Toys backlog in the repo. Each issue should include: - A clear title - A brief description of the task and why it is important to the project - A checkbox list of acceptance criteria From our recent planning meeting, the upcoming backlog includes the following tasks: 1. Allow users to filter games by category and publisher 2. Update our repository coding standards (including rules about Python formatting and docstrings) in a custom instructions file 3. Stretch Goal: Implement pagination on the game list page - Press enter or select the Send button to send the prompt to Copilot.
-
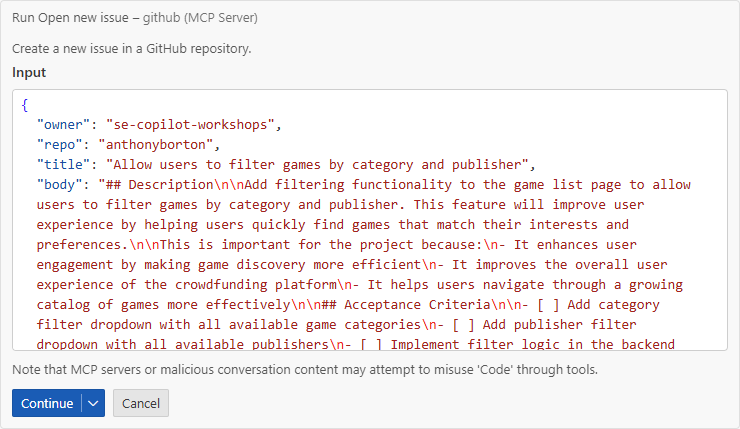
GitHub Copilot should process the request and respond with a dialog box asking you to confirm the creation of the issues.
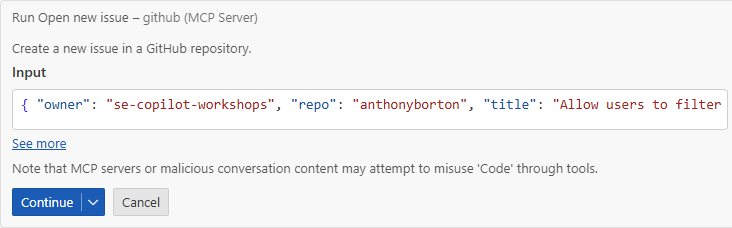
[!IMPORTANT] Remember, AI can make mistakes, so make sure to review the issues before confirming.
- Select see more in Run open new issue box to see the details of the issue that will be created.
- Ensure the details in the owner and repo, title and body of the issue look correct. You can make any desired edits by double clicking the body and updating the content with the correct information.
-
After reviewing the generated content, select Continue to create the issue.
-
Repeat steps 4-6 for the remainder of the issues. Alternatively, if you are comfortable with Copilot automatically creating the issues you can select the down-arrow next to Continue and select Allow in this session to allow Copilot to create the issues for this session (the current chat).
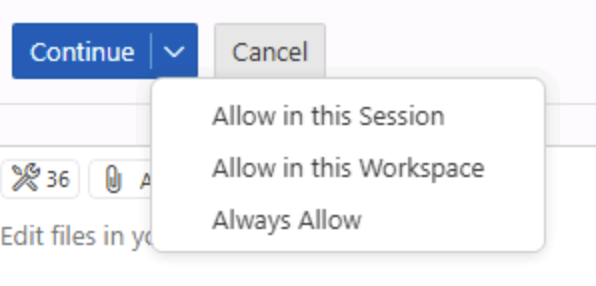
[!IMPORTANT] Ensure you are comfortable with Copilot automatically performing tasks on your behalf before you selecting Allow in this session or a similar option.
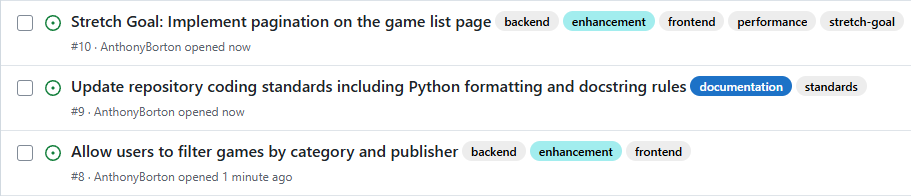
- In a separate browser tab, navigate to your GitHub repository and select the issues tab.
- You should see a list of issues that have been created by Copilot. Each issue should include a clear title and a checkbox list of acceptance criteria.
You should notice that the issues are fairly detailed. This is where we benefit from the power of Large Language Models (LLMs) and Model Context Protocol (MCP), as it has been able to create a clear initial issue description.
Summary and next steps
Congratulations, you have created issues on GitHub using Copilot Chat and MCP!
To recap, in this exercise we:
- used Model Context Protocol (MCP), which provides access to external tools and capabilities.
- set up the GitHub MCP server in your repository.
- used GitHub Copilot Chat agent mode to create issues in your repository.
With the GitHub MCP server configured, you can now use GitHub Copilot Chat Agent Mode to perform additional actions on your behalf, like creating new repositories, managing pull requests, and searching for information across your repositories.
You can now continue to the next exercise, where you will learn how to provide Copilot guidance with custom instructions to ensure code is generated following your organization’s defined patterns and practices.
Optional exploration exercise – Set up the Microsoft Playwright MCP server
If you are feeling adventurous, you can try installing and configuring another MCP server, such as the Microsoft Playwright MCP server. This will allow you to use GitHub Copilot Chat Agent Mode to perform browser automation tasks, such as navigating to web pages, filling out forms, and clicking buttons.
You can find the instructions for installing and configuring the Playwright MCP server in the Playwright MCP repository.
Notice that the setup process is similar to the GitHub MCP server, but you do not need to provide any credentials like the GitHub Personal Access Token. This is because the Playwright MCP server does not require authentication to access its capabilities.
Resources
- What the heck is MCP and why is everyone talking about it?
- GitHub MCP Server
- Microsoft Playwright MCP Server
- Anthropic MCP Servers
- VS Code Extensions
- GitHub Copilot Chat Extension
- Creating a fine-grained personal access token
Click the following link to move onto the next exercise. Next exercise: Providing context to Copilot with instruction files